Apr 26, 2014

Ken Forkish's Overnight Country Brown with Sesame Seeds


This time, I tried an adaptation of Ken Forkish's Overnight Country Brown from Flour Water Salt Yeast, baking a loaf with the addition of roasted sesame seeds. Forkish’s Overnight Country Brown recipe uses a long slow (8-15 hours) bulk fermentation, which brings out deep complex flavors and the natural sweetness of the flours. This bread has a slight hint of tanginess, which is a nice accent to accompany a meal. Forkish's book does not carry a recipe using sesame seeds, but I combined it with the Sesame Country Bread recipe from Chad Robertson’s Tartine Bread book. It worked pretty well.  


It was a warm day of early springtime, and the room temperature was 76F, about 5F degrees higher than my previous baking day. So I adjusted the temperature of the water I mixed in. The original recipe called for 90-95F water for mixing with flours for autolyse, supposing the room temperature was 70F, but I used 85F water instead for the autolyse. The dough temperature after the final mix was 82F, a little higher than the desirable dough temperature. Perhaps I should use even colder water (about 80F) for the final mix next time. 

The bulk fermentation was supposed to take 12-15 hours according to the recipe, until the dough rises to 2-3 times in size. My dough rose to double in 9.5 hours, earlier than I expected, perhaps since the initial dough temperature was rather high. I folded the dough 4 times in the initial 2 hours of the bulk fermentation, which seemed to give enough gluten strength to the dough.


Final rise time was supposed to be about 4 hours at room temperature according to the recipe, but I only gave 2 hours to the final rise in the refrigerator considering the warm weather. I could have given it a few more hours, though, since the resulting loaf seemed to be slightly under-fermented.


When I scored the loaf, there was a big air hole at one end of the slash. I thought that the air hole might deflate the loaf, but the hole was closed naturally while baking, so it was fine in the end with fairly good oven spring.      


I love the way the oval-shaped loaf makes a wide crack on top, since it seems to show the natural dynamics of the oven spring phenomenon most effectively.


With the addition of roasted sesame seeds, the bread gained extra depth both in the flavor and the taste. The crust was thin and crispy, and the inside crumb was soft and moist, with a nice chewy texture and a rich nutty aroma from the roasted sesame seeds, all enhanced by the long slow bulk fermentation. 


Compared with the Field Blend #2 with sesame seeds, the crumb was softer with bigger holes, with a more integrated flavor from the whole wheat flour and roasted sesame seeds. Also, the nutty flavor of the sesame seeds seemed to enhance the natural sweetness of the whole wheat. The long slow bulk fermentation certainly extracted the most from the umami flavors of sesame seeds and whole wheat, and infused them together into the crumb nicely. This might be my favorite sesame sourdough bread so far.


Overnight Country Brown (with Sesame Seeds)

7:00PM          Mix leaven (water=70F)
11:40PM        Float test (passed)
11:30PM        Autolyse (flour + 85F water)
12:00AM        Final mix + add sesame seeds
12:20AM        Bulk fermentation starts (Initial DT=82F)
9:50AM          Bulk fermentation ends (Final DT=70F)
9:50AM          Pre-shape / Bench rest
10:10AM        Shape the loaf
10:15AM        Final proof starts (in the refrigerator)
12:15PM        Final proof ends
11:15AM        Oven on @475F
12:15PM        Baking (30 min. with the lid, 25 min. without the lid)
1:10PM          Take out the loaf from the oven


Apr 20, 2014

Ken Forkish's Overnight Country Brown (2)


I really liked the way my first loaf of Ken Forkish's Overnight Country Brown from Flour Water Salt Yeast turned out, so I made the same loaf again with a different shaping method (I will explain it later in this post). The  recipe uses a very long overnight (8-15 hours) bulk fermentation at room temperature, using a small amount of young levain. This long slow fermentation process promotes vigorous activity in the dough, developing the gluten fully, resulting in a complex rich aroma fully extracted from the dough and creating a soft 
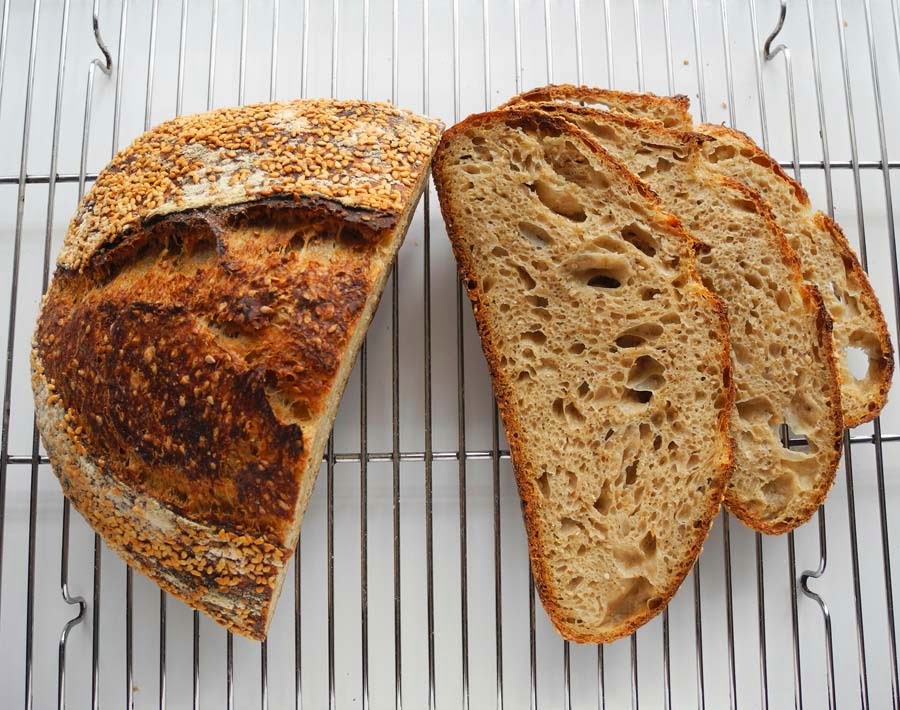
flavorful crumb with large irregular-shaped holes. I like the bubbly dough and the wild look of the resulting bread. This is so far my favorite daily bread.


This time, as one of my experiments, I used a younger levain that was 5 hours old, which had just passed the float test. In my previous loaf, I used 7 hours old levain by following the original recipe, which had a slight sour smell when I used. I was curious about how the age of levain would affect the taste of the final loaf.   


Bulk fermentation was 9 hours and 40 minutes at 72F room temperature, until the dough rose to double. I gave 4 foldings every 25 minutes in the initial 2 hours of bulk fermentation.      


After the long overnight bulk fermentation, the dough had a mild sweetish smell just like the dough of the Double-Fed Sweet Levain Bread, while the previous dough I made with 7 hours old levain had a rather acidic smell at this stage. 


Last time when I baked the same loaf, I omitted the pre-shape and bench rest time. But this time, I added pre-shape and 15 minutes bench rest before shaping the final loaf, to see if there would be significant differences in the crumb of the resulting loaf. 


After the 15 minutes bench rest, I flipped the dough for final shaping. 


With extra gentle handling, I tried to keep the trapped gases inside the dough as much as possible during the shaping stage. I folded the dough from 4 different angles, and made the loaf a round shape by tucking in the bottom of the dough from every angle by very gently using a bench knife.   


The shaped loaf was very bubbly and plumpy. I sprinkled some bran on the surface of the loaf, to add flavor and color. 


I like the way the crust opens on oval-shaped loaves, so I used an oval basket for the final rise again. Before placing the shaped loaf in the proofing basket, I sprinkled a 50/50 mixture of rice flour and all-purpose flour inside a basket, so the dough would not stick. 


After 2 hours and 17 minutes, I tried the 'finger-dent test', the method Forkish instructed in his book to see if the final rise was done. I sprinkled a small amount of rice flour on one spot of the loaf, and poked the spot with my finger. The finger-dent test is a little tricky when the dough is very cold after retarding in the refrigerator, since the cold dough reacts slower. (*Here is a good tip on how to know if the could dough is properly proofed, from The Fresh Loaf discussion board).

I left the dough at room temperature for a few minutes, then tried the finger-dent test again. The dough bounced back very slowly, so I judged that it was ready to bake.  


The proofed loaf was flatter than the previous loaf when I flipped it over onto the parchment paper. I was afraid that the loaf might not be able to hold its shape in the oven, due to my loose shaping. I placed the loaf onto a preheated combo cooker, wishing that there would be some oven spring.


After baking 30 minutes with the lid on, I removed the lid. It had actually a pretty great oven spring, to my surprise. Perhaps the fully developed gluten structure via the long overnight bulk fermentation must have given it strength to help the oven spring.


I was again very happy with the thin crisp crust and the deep amber color of the final loaf. The great thing about this Overnight Country Brown is the aromatic 'umami' flavor developed in the matured dough, that steeps deep into the crust and the crumb of the final loaf.

The effect of using younger levain was very subtle – there was a more sweetish aroma in the kitchen while baking, but this loaf had also distinct tanginess right after being baked just as the previous one. However, the tanginess of both loaves mellowed as time passed in a couple of days, so there was not so much recognizable difference in the resulting tastes. The slight hint of tanginess is actually great when having it with some other foods, since the tanginess brightens up the deliciousness of the meal whatever it is, like a nice spice or accent. 


I love the look of crumb of the Overnight Country Brown loaf. When I was struggling with baking Tartine Country loaves in the past, one of my main issues was that my dough tended to be under-fermented during the bulk fermentation stage (since I was always worried about over-fermentation). But after baking several loaves from Forkish’s book, I finally came to understand how properly fermented dough should feel and look with fully developed gluten structure that I should aim for during the bulk fermentation.  


Experiment: Shaping the loaf with pre-shaping vs. without pre-shaping


In most of Forkish's recipes, pre-shape was not included in the procedure (except some doughs that contain rye flour). I have been wondering if pre-shape is really necessary, and if so, why. I kind of liked the wild irregular holes in the crumb of the loaf I made without pre-shaping, but I was curious of the differences if I compared these two versions.
Chad Robertson wrote about the importance of the pre-shaping (initial shaping) and final shaping in his Tartine Bread as follows:

"The initial shaping of the dough sets structure for the final shape. With highly hydrated dough, the final shape is crucial for developing the tension or force needed for the loaf to maintain its form throughout the long final rise. Proper final shaping is also essential to achieve the dramatic arced "ears" that bloom forming a decorative crust when your scores expand and open." (Chad Robertson)

So for my experiment, I changed the shaping methods in the last two Overnight Country Brown loaves to see if shaping with pre-shaping or without it had some effect on the final shape of the loaf and the crumb. 

Here is a comparison of the side shot of both: The loaf without pre-shaping and bench rest (above) seemed to have a little weaker dough structure, resulting in somewhat uneven and less oven spring, with one side of the loaf slightly corrupted. The loaf with pre-shaping (below) seemed to hold the dough structure better, resulting in higher and more even oven spring. So when it comes to a matter of visual appeal, the loaf with pre-shape was better.


Crumb comparison: shaped with or without pre-shaping


The crumb structures of both loaves looked different, too. Both had large air holes, but the holes in the loaf without pre-shaping were not evenly distributed. Meanwhile, the holes in the loaf using pre-shaping and bench rest were more evenly distributed, and the loaf has risen more vertically than the other. The crumb of the latter showed more dynamic moves of the gluten structure, which must have been the reason of higher oven spring.  


Taste and flavor comparison


As for the tastes and the flavors, I must say that both loaves were equally great - really hard to tell which was better. But I kind of think that the crumb of the loaf without pre-shape was somewhat softer and more flavorful, perhaps since the gluten structures were more relaxed and the gases trapped inside the crumb were more intact. I don't really know how the differences actually affected the final loaves, but my conclusion after this experiment was that the pre-shape makes the loaf look better visually, helping the oven spring at maximum. But taste-wise, the loaf without pre-shape was just fine (or could be even better).       


FWSY: Overnight Country Brown (2)

7:10PM         Mix leaven (water=70F)
12:05AM       Float test (passed)
11:40PM       Autolyse (flour + 80F water)
12:15PM       Add salt and levain for Final mix
12:25PM       Bulk fermentation starts (Initial DT=79F) at 73F
10:05AM       Bulk fermentation ends (Final DT=72.8F)
10:05AM       Preshape + Bench rest (15 min.)
10:20AM       Shape the loaf (without bench rest)
10:30AM       Final proof starts (2 hours 17 minutes in the refrigerator)
12:47PM       Final proof ends
11:20AM       Oven on @475F
12:47PM       Baking (30 min. with the lid, 20 min. without the lid)
1:37PM         Take out the loaf from the oven


*room temperature = 72F - 75F
*outside temperature = 59F (warm day of early spring)


Apr 17, 2014

Ken Forkish's Overnight Country Brown (1)


After being very satisfied with several loaves of Ken Forkish's Field Blend #2 with some variations, I decided to try another Forkish signature recipe from Flour Water Salt Yeast - Overnight Country Brown. In his book, there is another version called Overnight Country Blonde (with 90% white flour, 5% whole wheat flour and 5% rye flour), which is the most popular bread at Ken’s Artisan Bakery, Forkish's own bakery in Portland. (My friend in Portland visited the bakery and tried a loaf recently, and said it was amazing.) The Overnight Country Brown contains 70% white flour and 30% whole wheat flour, which is a ratio of flours I really like.


This recipe calls for a long overnight bulk fermentation process (12-15 hours at room temperature) with a smaller amount of levain than other recipes in this book. The natural sweetness and complex rich flavors of the flours are supposed to be fully extracted via the long slow bulk fermentation. It sounded fantastic - I was curious about how this long overnight fermentation method would affect the resulting taste of the loaf.

My levain was mixed 7 hours before the final mix, as the recipe suggested. I normally use a few hours younger levain than that, which barely passes the float test, but I decided to follow Forkish’s instruction this time to see how the more matured levain affected the bread.     


During the bulk fermentation, the dough was supposed to rise to 2-3 times its size after 12-15 hours. Perhaps because the initial dough temperature was a little too high (81F), the dough rose faster than I expected, more than double in 9 hours. After long overnight bulk fermentation at room temperature (71F), the dough looked very gassy and vigorous, which was a good sign.


A unique part of Forkish's method is to omit bench rest before final shaping. I had never omitted bench rest in my baking, but this time I decided to follow his way to see how the resulting loaf would be different without bench rest.


Final rise went faster than expected, perhaps since the dough was more active at this stage. I proofed the loaf at room temperature for 1.5 hours, then proofed it in the refrigerator for another 20 minutes to slow down the fermentation. The proofed loaf was very bubbly.


Oven spring was pretty good. I was slightly worrying that the directly shaped dough without bench rest might not have gained enough strength and tension for good oven spring, but it turned out OK. I baked the loaf in a preheated oven with combo cooker at 475F for 30 minutes with the lid, and 20 minutes without the lid. 


One issue was that my oven tends to go up 50 degrees higher than the set temperature, so accidentally I baked the loaf at 525F for the first 10 minutes or so, which caused some burnt spots near the bottom. I need to remember in the future to set the oven temperature lower than it is supposed to be.  


Although the final loaf had some burnt spots, I was very happy with the thin crisp crust and the deep amber color of the bread. Forkish's way of shaping the loaf without bench rest seemed to give the crumb larger, more relaxed-looking irregular holes than the loaf with bench rest. I like the wild look of the open crumb.


The characteristic of this bread was the tanginess from acidity that was quite recognizable right after being baked, but the tanginess mellowed as the loaf matured. I was surprised at the obvious transition of the taste and flavor of the bread. The initial tanginess faded out over the next couple of days, and melded into a wonderful, deep sweetish umami flavor - almost like some magic turned it into different bread.


The crumb was very tender and moist, a great contrast with the crisp thin crust. (Actually, the burnt spots tasted amazing.) The gluten seemed to have fully developed via the long overnight bulk fermentation. Forkish wrote in his book that the aroma and flavor of this bread would directly reflect the character of levain. Next time, I will try to use even younger levain to see how it would affect the resulting taste. 


FWSY: Overnight Country Brown

2:55PM         Mix leaven (water=65F)
9:25PM         Autolyse (flour + 85F water)
9:55PM         Add salt and levain for Final mix
10:05PM       Bulk fermentation starts (Initial DT=81F) at 69F
7:05AM         Bulk fermentation ends (Final DT=76F)
7:05AM         Shape the loaf (without bench rest)
7:15AM         Final proof starts (initial 1.5 hours at 71F room         
                    temperature, then 20 minutes in the refrigerator)
9:05AM         Final proof ends
8:20AM         Oven on @475F
9:05AM         Baking (30 min. with the lid, 20 min. without the lid)
9:55AM         Take out the loaf from the oven


*room temperature = 69-71F
*outside temperature = 34F (very cold day with snow)